1. Reverb <br> The way the sound decays in the room is an important factor affecting sound recording. The effect of reverberation on sound is two-sided, which can be better or worse. Reverberation time is an important condition. Reverberation time refers to the time between when the sound source stops sounding and when the sound completely disappears. A more technical description of the language is the time it takes for the sound to decay by 60 dB. For recordings of language and vocals, the reverberation time must be very short ("silent" room). The reverberation time of the control room is relatively short. The reverberation time between music receptions usually depends on the type of music. The impulse response of a room (the sound is taken from an exploding balloon) shows all the independent reflections.

Convert the sound to a level value (this can be read in dB)
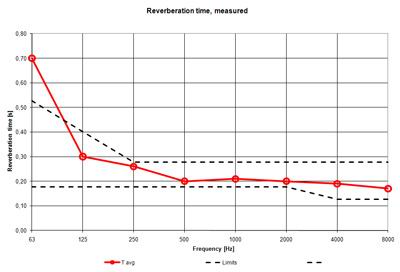
Frequency analysis of reverberation time. The signal has been processed by a filter. In this example the low frequency (63 Hz) reverberation time has exceeded the limit. This sample is taken from a small room for sound editing.
In general, the key issue is the change in reverberation time with frequency. If the low frequency reverberation time is too much than the intermediate frequency, it will cause a lot of trouble. In the studio and control room, a low frequency reverberation time of less than 125 Hz is typically 1.5 times the intermediate frequency. However, in the rock music scene, the reverberation time of the low frequency is more similar to the intermediate frequency. The following is the reverberation time (at 500Hz) that is generally used in different applications:
Application reverberation time (seconds)
Vocal room 0.1 – 0.2 The room should not be too small. A room that is too small will bring a box-like sound, and there will always be low frequency problems (low frequency is too heavy)
Control Room 0.2 – 0.3 If you want to play some acoustic instruments in the control room, the reverberation time can be slightly higher.
Recording room 0.4 – 0.6
Living room 0.4 – 0.5 If your room has only five speakers and a wooden chair, the reverberation time is likely to exceed this value.
The Auditorium 0.6 – 0.9 must guarantee the volume of the language as well as its intelligibility
Cinema 0.7 – 1.0 to ensure balanced playback quality
Rock and roll scene (small) 0.6 - 1.6 To have a balanced frequency response. The room has a volume between 1.000 m3 and 10.000 m3.
Theater 1.1 – 1.4
The opera house is about 1.6 reverberation time to make the singing sound have enough sustain, but also to ensure a certain intelligibility
Classical Music Hall 1.8 – 2.2 Up and down depending on the size and music type of the hall
Calculation of reverberation time T = 0.161 * V / A
T represents the reverberation time, in seconds, V represents the volume of the room, in cubic meters, A represents the total sound absorption coefficient of the room. The total sound absorption coefficient is based on the sound absorption coefficient of each material in the room multiplied by the total area of ​​the material. (square meters) derived. This formula applies to any sound frequency that needs to be calculated. The usual calculation method is to use an octave bandpass from 63 to 8 kHz or a 1/3 octave bandpass from 50 Hz to 10 kHz.
How to get the right reverberation time <br> The total volume of the room and the total sound absorption coefficient determine the reverberation time. (See paragraph below on sound absorption). It should be known that perforated sound absorbing materials are very efficient - but only at the high frequency end. This is why a lot of low frequency sound absorption is needed to get the natural reverberation of the entire frequency band.
2, sound insulation <br> Sound insulation is also a way to prevent sound from passing from one room to another. The only effective way to achieve sound insulation is to seal the room with heavy walls and floor/ceiling. In order to make the sound insulation of two adjacent rooms more effective, there should be no fixed connection between the two rooms. In general, this means that each room is two separate closed boxes built on the same foundation.
The effect of placing a partition, sound barrier, etc. in the recording room depends on the size of the barrier. In order to avoid low frequency diffraction bypassing the barrier, the barrier must be very large. In the real world, it is easier to build a closed room. Sometimes the reason for the failure of sound insulation comes from the floor (or stage). To ensure that the noise of the microphone itself is not picked up, the microphone should be mounted on the shock mount to avoid problems.
The only way to get good sound insulation and low frequency sound insulation is to place the sound source in a separate room. If a very large amount of sound is required, the room should have separate walls, each wall made of three layers of plasterboard or similar structure. The floor must be floated. For higher frequencies (eg above 300-400 Hz), some sound insulation can be obtained through the sound barrier. However, the effect of this is very limited. If it is only used to separate the instruments in the recording room or on the stage, the sound barrier can be used to avoid direct squeaking into the pickup microphone of the adjacent instrument.
3. Sound Absorption <br> We control the acoustics by using sound absorbing materials, such as controlling the reverberation time. It is necessary to pay attention to the different effects of different materials on the various frequency bands of the sound. Technically, we can define the sound absorption coefficient from 0.00 (no absorption at all, such as a hard marble surface, all sounds are reflected) to 1.00 (for example, an open window, there will be no reflection after the sound is transmitted) . In general, porous sound absorbers (foam, cloth, mineral wool, fiberglass, etc.) absorb higher sound frequencies and have a good sound absorption effect, and the sound absorption coefficient can exceed 0.7. However, if the multi-porous sound absorbing material is installed at a distance (25 to 30 cm) from the hard surface (wall or floor), the sound absorption range can be expanded downward to 100 Hz.

Sound absorption curve of porous sound absorbing material
Resonant sound absorbing materials (perforated plates, slitted walls, etc.) have a good sound absorption effect for the intermediate frequency portion (200 Hz to 5 kHz).
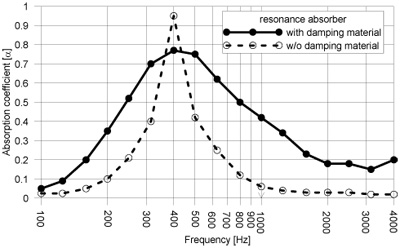
Sound absorption curve of resonant sound absorbing material
The film absorber can act on low frequency sound absorption. Such structures can be part of the building's structure: lightweight walls, windows, floating floors, and more. This type of sound absorber is not very effective, and the sound absorption coefficient ranges from 0.2 to 0.3. However, if the membrane structure is part of a building, you can get a large sound absorption area. The film absorber is placed at the corner for maximum effect.
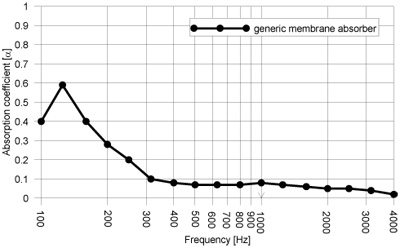
Sound absorption coefficient of film absorber
How to get the right sound absorption <br> First of all, make sure you need to absorb the sound of those frequency bands. For example, the reverberation time in a part of the whole sound frequency band is too long and needs to be absorbed. Then choose the right sound absorber. Remember that no matter how trendy the sound absorbing device is, we need the actual results, so be sure to get reliable parameter descriptions when buying such products.
4, acoustic reflection
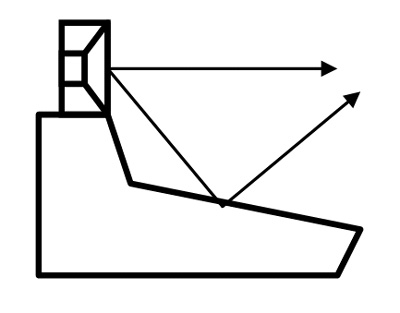
Single reflection <br> Single reflection is harmful. If the microphone picks up both the direct sound and a single reflected sound, it will cause comb filtering, which will result in spaced sound doubling and sound cancellation over the entire spectral range. Therefore, a single reflection is always a phenomenon that should be eliminated. The various types of reflections (from the tabletop and ceiling) that are present in the control room often result in acoustic staining similar to comb filtering. Although vertical reflections are generally difficult to hear, excessive single reflections should be avoided. In the recording room or concert hall, the multiple reflections are part of the scattered sound field, which controls the direction of the sound so that all instruments can be heard. Reverb can also be seen as a combination of multiple reflected sounds.
How to avoid single reflection <br> Too strong single reflection can be solved in the following ways: Place a diffuser on the reflective surface with a sound absorbing material at the reflection point to control the direction of reflection so that it does not enter the ear or microphone. In the recording, the microphone's directivity principle should be properly utilized to point the blind spot of the microphone pickup to the direction of the reflected sound source.
5. Acoustic Scattering <br> Acoustic scatter is achieved by using a diffuser or simply using all kinds of equipment and furniture in the room. When the sound hits the surface of the object, it is reflected in many different directions. This physical surface must have a large enough area to correspond to the wavelength of the acoustic wave that needs to be scattered. This is why low frequency diffusers are rarely seen. In order to prevent the acoustic reflection from interfering with the stereo sound field, the diffuser must be effective over a range of frequencies, such as 600 to 800 Hz. It is also important to note that the generally effective diffuser also provides some sound absorption. The sound absorption coefficient is about 0.2 in the effective range of the diffuser.

Schroeder
How to scatter sound 1, a large amount of equipment accumulation and furniture furnishings usually play a good role in scattering
2. The bookshelf with books will have a good effect (and have a wide range of sound absorption)
3. The diffuser (Schroeder type) can scatter sound very well, either vertically or horizontally, or both.
6, standing wave <br> In the open space, the sound will naturally spread in all directions. In the room, when the sound hits the wall, it is reflected back into the room. This way the sound will travel back and forth between the same parallel walls on both sides, back and forth in the corners, and so on. The low frequency wavelength is usually close to the size of the room, especially for smaller rooms.
A phenomenon that is interesting – but usually not very popular – is what we call standing waves. When a particular wavelength is exactly the same size as the room, the resulting difference in sound pressure level will be very large as you record or listen to the location in the room. At the junction of the rooms, the sound pressure level will peak – the strongest in the corner of the room. In other locations in the room, the same frequency may be as low as 20 to 30 dB. Imagine a speaker placed close to the wall. The sound source (that is, the speaker) produces a sound that shines out of the speaker, hits the opposite wall and returns to the sound source. If it arrives at the speaker position just after the speaker emits the next wavelength cycle of the same frequency sound, the last reflected sound is in the same phase position as the new sound. Both sounds will spread to the opposite wall at the same time. When they reach the wall, they are reflected at the same time, reaching the speaker and mixing with the third wavelength period emitted by the speaker, and so on.
The lowest frequency of standing waves generated between two parallel walls, the wavelength of which is equal to twice the distance between the walls.
Example: The distance between the two walls is 2.5 meters, the speed of the sound is 340m/s, and the distance of the double distance is 5 meters. The standing wave wavelength is calculated as follows:
λ = c / f
Where λ represents the wavelength (m, m) c represents the speed of the sound (meters per second, m/s) f represents the frequency (hertz, Hz) where 5 = 340 / f
↓
f = 340 / 5
↓
68 Hz
The smaller the room size, the greater the impact on recording and sound playback. Small voices are usually the most serious. However, the low frequency response of the monitor can be adjusted in a small control room or composing room. Standing waves are present in all rooms, but measures can be taken to keep their impact to a minimum.
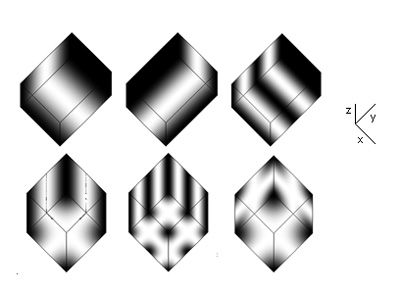
Standing wave
How to avoid or deal with standing waves <br> Standing waves cannot be completely avoided. However, its impact is controllable:
1. Avoid parallel wall surfaces in a box-shaped room, the size of which should not be an integer ratio to each other. Use an effective corner sound absorber (mostly a membrane sound absorber) Try to keep the control room symmetrical so that the speaker is away from the corner
7, room size <br> Room size will affect many acoustic parameters. Larger room volumes usually mean longer reverberation times. However, for the control room and the studio, make sure there is enough starting space, especially if there is enough room height. After designing the room layout, adding sound-absorbing materials, installing the equipment, etc., you may end up with little room for activity. The size of the room will affect the frequency of standing waves. The distance between the reflective surfaces will always have their specific sound characteristics, and the sound of a small room will always be characteristic of a small room unless you use a close-range microphone to pick up the sound. The room used for rehearsal must have enough space for all types of facilities.
In the case of concert halls, theaters, etc., the audience can be seen as part of the room's sound absorption facilities. If the room volume is too small, the reverberation time is greatly affected by the number of listeners.
How to get the right room size <br> The room that is too big is always much better than the room that is too small. The ceiling of the room used for recording and monitoring should not be too low. Take into account the number of people in the room (recording studio, control room, rehearsal room, small concert hall, etc.) to ensure adequate acoustic space.
8. Background noise <br> The background noise of the studio may become a hindrance to work because it will make the recording turbid. If you add compression to the signal, the situation will be even worse. The noise may come from the computer's fan and hard drive, which may be hum, possibly from the noise in the next room, or on the street. In the live news room, it is often disturbed by the noise of the editorial room.
Different noise metrics can be used when designing different types of rooms: NR-15/NC-15 (SPL is similar to SPL20dBA) or NR-20/NC-20 (SPL is similar to 25dBA), depending on the use of the room.
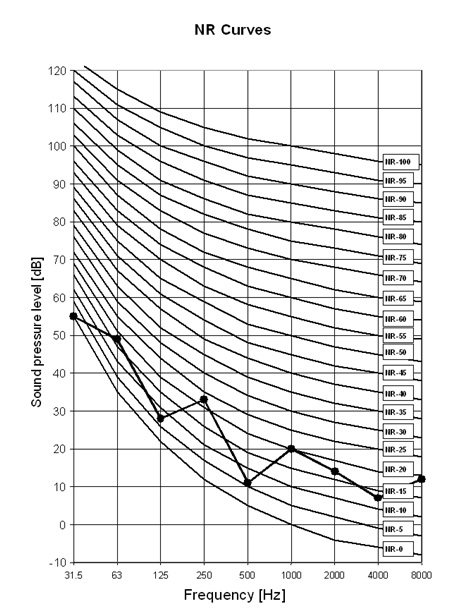
An example of an NR curve is measured using a 1/1 octave bandwidth noise top marker. The measurement result is the lowest noise metric curve not exceeded (=NR-25)
How to avoid room noise 1. Remove all noise sources (it's that simple)
2, use a close (and more recent) microphone recording
3. Use the close-talk effect of close-range microphone to reduce the low frequency of long-distance sound source
9. Mechanical vibration The mechanical vibration inside the building produces an audible sound. If the microphone stand is placed on a vibrating floor, it may cause noise in the microphone. Some loose mechanical parts in the room can also cause problems.
How to avoid mechanical vibrations 1. Use a microphone shock mount to avoid picking up vibration noise from the microphone
2. The resonance frequency of the damping system must be lower than the lowest frequency of the recorded sound.
3. Reduce the resonant frequency and use a thicker and softer suspension layer
10, headphones in many times headphones are a practical approach. It isolates you from the surrounding sound source. However, be careful that the volume of the headphones is not too large (should follow certain headphone volume standards). Be careful not to let the sound of the headphones leak into the microphone. If the headset is used for personal monitoring or listening, the headset signal should be in the same phase as the microphone signal.
PVC insulated flexible wire refers to electrical wires with excellent flexibility. This kind of wire adopts pvc insulation, which is very resistant to corrosion, impact, abrasion, weathering, and even chemical rotting, therefore it can well protect the inside conductor and ensure large electricity transmission capacity. Also the wire has a decent mechanical strength, presenting a super performance when acted by mechanical force. This wire finds its application in household appliances, Mini Electric Tools, instruments, lighting & other electrical equipment.
Advantages:
- Corrosion & abrasion resistant
- Resistance to breakage
- Large tensile strength
- Good moving performance
- Good softness
- Excellent elasticity and stickiness
- Resistance to skin effect
- Long life span


Standard:
GB/T5023.3-2008
Rated Voltage:
450/750V

Application:
- Household electrical appliances
- Small electric power tools
- Instruments
- Apparatuses
- Lighting devices
- And many more...
Welcome to visit our factory to learn more about us. If you have any questions, please feel free to contact us.
PVC Insulated Flexible Wire,Flat PVC Jacket Flexible Wire,PVC Jacket Flexible Wire,Flat Flexible PVC Insulated Wires
Fujian Lien Technology Co.,Ltd , http://www.liencable.com